Organization
All functionalities and features in AcsysXTelecom are controlled by the Organization tree which is arranged in terms of Company,
Country, Region, Clusters and Sites. There are four entities under this module as Organization, Country, Region and Cluster.
Edit Organization
Super Admin user can edit the Organization Name, which is ideally done at the time of first installation and setup.
All the action menus are grouped inside the ‘ToolBox’ at right bottom of the screen. Click on the ‘ToolBox’ to open and click the action button ‘Edit’.
Organization Name will be editable; modify the name and click ‘Save’.
Once details are saved a confirmation window will be displayed. Click ‘OK’ to close the confirmation window
Add Country
Admin users can add country by selecting the Organization node from the left side tree view
Click ‘Add’ from the ‘ToolBox’.
Country details page will be shown on the right side pane.
Enter the Name, Contact number of the office, contact email ID, office latitude and Longitude, Country Code and Time zone and click ‘Save’ from the ‘ToolBox’
Once details are saved a confirmation window will be displayed. Click ‘OK’ to close the confirmation window.
Note: Time zone can be added either against the country OR ‘Regions’ (in case of multiple time zones with in the country).
Edit Country
Admin users can edit the country details by clicking the respective country name from the left pane and click ‘Edit’ from the ‘ToolBox’.
Country details page will be shown on the right side pane.
Modify the required fields and click ‘Save’ from the ‘ToolBox’.
Once details are saved a confirmation window will be displayed. Click ‘OK’ to close the confirmation window
Delete Country
Admin users can delete a country by clicking the respective country name from the left pane and click ‘Delete’ from the ‘ToolBox’
A confirmation window will appear confirmation. Click ‘OK’ to delete the respective Vendor.
Note: Click ‘Cancel’ will close the confirmation window.
Once deleted, an information window will be displayed. Click ‘OK’ to close the information window.
Add Region
Admin users can add Region by selecting the desired Country (under which the region is to be added) from the left side tree view.
Region details page will be shown on the right side pane.
Once details are saved a confirmation window will be displayed. Click ‘OK’ to close the confirmation window
Edit Region
Admin users can edit the Region details by clicking the respective Region name from the left pane and click ‘Edit’ from the ‘ToolBox’. Region details page will be shown on the right side pane.
Modify the required fields and click ‘Save’ from the ‘ToolBox’.
Once details are saved a confirmation window will be displayed. Click ‘OK’ to close the confirmation window
Delete Region
Admin users can delete a Region by clicking the respective Region name from the left pane and click ‘Delete’ from the ‘ToolBox’.
A confirmation window will appear confirmation. Click ‘OK’ to delete the respective Site
Note: Click ‘Cancel’ will close the confirmation window.
Once deleted, an information window will be displayed. Click ‘OK’ to close the information window.
Add Cluster
Admin users can add Cluster by selecting the desired Region (under which the Cluster is to be added) from the left side tree view.
Cluster details page will be shown on the right side pane. Key in the required fields and click ‘Save’ from the ‘ToolBox’.
Once details are saved a confirmation window will be displayed. Click ‘OK’ to close the confirmation window
Edit Cluster
Admin users can edit the Cluster details by clicking the respective Cluster name from the left pane and click ‘Edit’ from the ‘ToolBox’. Cluster details page will be shown on the right side pane.
Modify the required fields and click ‘Save’ from the ‘ToolBox’.
Once details are saved a confirmation window will be displayed. Click ‘OK’ to close the confirmation window
Delete Cluster
Admin users can delete a Cluster by clicking the respective Cluster name from the left pane and click ‘Delete’ from the ‘ToolBox’.
A confirmation window will appear confirmation. Click ‘OK’ to delete the respective Vendor.
Note: Click ‘Cancel’ will close the confirmation window.
Once deleted, an information window will be displayed. Click ‘OK’ to close the information window.
Vendors
Vendors of the Telecom Infra Company can be added here. Vendors can be added under/against any geographical area. They will be available for the operational modules against those specific geographical areas.
Click on System -->Field Operations --> Vendors to get the vendors page. The list of vendors added to the system will be listed on the page.
Note: Vendors under/against the logged in user’s allowed regions will be listed here.
Add Vendors
Click on the down arrow at the top of the vendor listing to add a new vendor.
Vendor details will be displayed at the top of the page by minimizing the list.
Key in the required fields and click ‘Save’ from the ‘ToolBox’.
Once details are saved an information window will be displayed. Click ‘OK’ to close the information window.
Edit Vendors
Admin users can edit the Vendor details by clicking the check box against the respective Vendor name from the list. Vendor details will be populated in respective fields.
Modify the required fields and click ‘Save’ from the ‘ToolBox’.
Once details are saved a confirmation window will be displayed. Click ‘OK’ to close the confirmation window
Delete Vendors
Admin users can delete a Vendor by clicking the respective Vendor name from the list and click ‘Delete’ from the ‘ToolBox’.
A confirmation window will appear confirmation. Click ‘OK’ to delete the respective Vendor.
Note: Click ‘Cancel’ will close the confirmation window.
Once deleted, an information window will be displayed. Click ‘OK’ to close the information window.
Account Policies
Add Account Policy
Admin users can add new Account Policy. Click on the down arrow at the top of the Account Policies listing to add a new Account Policy.
Account Policy details page will be displayed at the top of the page by minimizing the list.
Pages and features of the software can be controlled using the Account Policy (based on the policy Type).
Admin User can select each menu item and control the required access for pages and their respective actions (like Add, Edit, Delete, Import, Export)
Edit Account Policy
Admin users can edit an Account Policy by selecting the desired Account Policy from the list. Account Policy details page will be displayed at the top of the page by minimizing the list.
Modify the required fields and click ‘Save’ from the ‘ToolBox’.
Once details are saved a confirmation window will be displayed. Click ‘OK’ to close the confirmation window
Delete Account Policy
Admin users can delete an Account Policy by clicking the respective Account Policy name from the list and click ‘Delete’ from the ‘ToolBox’.
A confirmation window will appear confirmation. Click ‘OK’ to delete the respective Site
Note: Click ‘Cancel’ will close the confirmation window.
Once deleted, an information window will be displayed. Click ‘OK’ to close the information window.
User Management
User management is classified into two parts as ‘Users’ – where the user details are managed and ‘Account Policies’ – where the software modules and features permissions are managed.
Users
iAMS can have four types of users as Account User – employees of the organization who use Software, Management Users – employees of the organization who won’t use the software but
need to be informed/alerted from the software, Field Users – Key Users, App user – Field Users who use a mobile app (from Acsys), Tenant Users – Users from the Tenants of the Infra Company,
Vendor Users – Users from the Vendors of the Infra Company.
Click on System -->User Management --> Users to get the Users page. The list of Users added to the system will be listed on the page.
Note: Users under/against the logged in user’s allowed regions will be listed here.
Add Users
Admin users can add new users. Click on the down arrow at the top of the Users listing to add a new vendor.
User details page will be displayed at the top of the page by minimizing the list.
Once a user type is selected, the associated fields will appear in a sliding overlay. Select/key in the details and click on the down arrow at the right bottom of the overlay to close the overlay.
Note: One user can be in multiple categories like a Vendor User can be an account user OR a Vendor User can be a Field User OR a Tenant User can be a field user OR an Account User also.
Key in the required fields and click ‘Save’ from the ‘ToolBox’.
Once details are saved an information window will be displayed. Click ‘OK’ to close the information window.
Edit Users
Admin users can edit the User details by clicking the check box against the respective User name from the list. User details will be populated in respective fields.
Modify the required fields and click ‘Save’ from the ‘ToolBox’.
Once details are saved a confirmation window will be displayed. Click ‘OK’ to close the confirmation window
Delete Users
Admin users can delete a User by clicking the respective User name from the list and click ‘Delete’ from the ‘ToolBox’.
A confirmation window will appear confirmation. Click ‘OK’ to delete the respective Vendor.
Note: Click ‘Cancel’ will close the confirmation window.
Once deleted, an information window will be displayed. Click ‘OK’ to close the information window.
Inventory
Programmer
Transfer Key
Access Media
Access Media Initialization
Access Point
Access Point Assignment
Asset Types
System Status
About
OEM Integrations
Acsys Mobile License
iAMS License
Diagnostics
Help
It displays all the details about all the Pages
iAMS License
It displays iAMS License Details
Acsys Mobile License
1.User can able to find the Mobile Applications available in both iOS & Android version.
2.Link to download the latest version available from Appstore & Play store available here.
3.Few screen shot with explanation also available to understand the Mobile application
Code Authorization
Now its subscribed and available in your mobile app
Field Audit
This module will be enabled if the Workforce Security features is subscribed and available in the Dashboard Module. Pictures taken from the Sites as per the Picture verification are displayed in this page
Code Notification
Now its subscribed and available in your mobile app
Ticket Based Access
Now its subscribed and available in your mobile app
Register Access Points (BLE)
Now its subscribed and available in your mobile app
Access On the Go
Now its subscribed and available in your mobile app
Access Assignment
Now its subscribed and available in your mobile app
System Status
This page summarizes the hardware asset such as Access Point, Access Media and Transfer key status across the Organization.
Click SYSTEM MENU -> INVENTORY -> SYSTEM STATUS
Access Point Status
List all the Access Point details along with the status
Access Media Status
List all the Access Media details along with the Status
Transfer Key Status
List all the Transfer key details along with the Status
Asset Types
In this module, Asset types are managed here, and User has Add, Edit, Delete, Export and Clear functionalities. System shows some predefined Assets which can be reused.
Click SYSTEM MENU -> INVENTORY -> ASSET TYPES
Add
1.Enter the Asset Type Name, Asset Type Code and Select the PM Cycle from the list
2.Enter SLA and Click “Save”
Edit
Select the desired Asset Type from the grid, modify the changes and Click “Save”. Asset Types updated successfully.
Delete
Select the desired Asset Type from the grid and Click “Delete”. Asset Type deleted successfully.
NOTE: Predefined Asset Types and Assets assigned to the Asset Points cannot be deleted.
Export
Asset Types list can be exported in the PDF & Excel format.
Access Point Assignment
Access Point must be assigned to the Asset Point and its Asset and Initialize the same.
NOTE: This action can be done only when the Asset Point and Assets are ready
Click SYSTEM MENU -> INVENTORY -> ACCESS POINT ASSIGMENT
1.Select the Asset Point from the Asset Point dropdown list
2.Select the Assets for which the Access Point is to be assigned
3.Select the Access Point and Click “Assign”
4.Once it’s been assigned, select the desired Access point from the grid and Click “Initialize”
The following window appears and displays the Initialization process of Access Point.
Insert the Transfer key into the Programmer and wait for the commands to be transferred to the Key.
Once it’s done, insert the transfer key into the Access point and Initialize it and insert the key into the Programmer for the confirmation as below and Click OK.
Access Point
The Access Points (Locks) are added to the System in this page and Users has Add, Edit, Delete, Import & Clear features
Click SYSTEM MENU -> INVENTORY -> ACCESS POINT
Add
1.Select the Access Point Type from the list
2.Enter the Access Point Serial Number and Alias Name
3.Select the Initialization Date and Click “Save”
Edit
Select the desired Access Point from the grid and modify the changes and Click “Save”. Access Point updated successfully.
Delete
Select the desired Access Point from the grid and Click “Delete”. Access Point should be deleted successfully.
NOTE: Access Point will not be deleted if Asset Point is Opened.
Import
User can bulk import the Access Point into the System. File format should be in .xls or .xlsx to import.
1.Upload the File on clicking the Browse (…) button and click “Upload” button
2.Map the fields and Click Import
Access Point Imported successfully.
Site Tenants
iAMS allows the addition of tenants against sites. This allows to save basic details information about the tenant(s). Only one tenant can be added as the Anchor Tenant. If the anchor tenant is already added, further tenant additions will have the ‘Anchor Tenant’ checkbox disabled.
The software user can search the site ID and the geographic information.
Add
The user can add tenant details – Name, Description, Contact Person Name, Contact Number, email and attach the logo of the tenant.
Steps to Add Site Tenants:
1.User can click the Expand button provided below the tool bar on the Right side
2.The Screen get expanded and User can select the Site ID ,Country, Region and Cluster from the List box.
3.Enter site general information (Tenant Name, Tenant Contact Person, Mobile Number, Email and Description)
4.Click and Add image of the Site if required
5.Click check box to Enable Anchor Tenant
6.Mandatory Fields are marked with * .
7.Click “Save" button the tool bar to Add the Site Tenant Details
8.Once you create a Site Tenants with all details, The Details will be shown in the tabular format
9.Click on the Site ID will navigate to the below “SITEFACTSHEET “screen, Which will provide the complete details of the Site.
Delete
Steps to Delete Site Tenants:
1.Select Any of the row by clicking the check box button as shown in the above diagram, will expand with the site Details
2.User can able to delete multiple Site Tenants details by clicking the multiple check boxes in the respective rows.
3.And by clicking the “Delete” button in the tool bar to delete the selected Tenants details.
4.If Assets are assigned /Used then system will not allow you to delete the sites Tenants details .
5.Otherwise system will display a confirmation message "Are you sure you want to delete the selected site?"
6.Click “Yes" to delete the Site Tenants Details.
Export
1.User can Export a single /Multiple selected Site Tenants Details by selection and clicking the “Export” button from the tool bar
2.An option to select as a PDF /XLS format to Export the Site details
3.The above Tabular column shows a sample exported file in XLS format.
Transfer Key
This segment where the Transfer Keys are managed here. User can add Transfer Keys in the System and Initialize the same using iAMS Connect.
Click SYSTEM MENU INVENTORY TRANSFER KEY
Users has the Initialize, Delete, Export, Clear functionalities
Add Transfer Key
1.Select the Geography and Transfer Key Type
2.Enter the Transfer Key Serial Number and Alias Name and Click Initialize
3.User prompts with the message as “Please take transfer key for initialize and follow the instruction” with OK button
4.Click “OK” and Insert the Blank Transfer Key into the Programmer and watch the initialization process + iAMS connect
5.User is displayed with “Initialization Process” window as below and prompts “Initialized successfully” once it is done with OK button. Click “OK”
6.The iAMS Connect shows as below once it’s been configured successfully.
Delete
Select the desired Transfer key from the grid and Click “Delete”
The following window displays the procedure to delete the Transfer key.
Click “OK” button and Insert the Transfer key into the Programmer and delete the same.
NOTE: The transfer key will not be deleted when there is only single Transfer key and Access Points are available in the System and throw the below error. After deletion of Access points only, the Transfer Key can be deleted.
Export
Transfer Key list can be exported in the PDF & Excel format.
Live Chat
IAMS can connect with the Acsys Support system through LIVE CHAT whenever support is required. The support ticket can be further monitored by the customer through the support ticket monitoring tool.
Live Chat is a LICENSE feature, enables only when it is subscribed.
End User clicks on the Profile name or Profile icon in the right corner of the application
Click Live chat to Open the Live Chat Screen
The Live chat window appears as below.
Enter your name, Email address and the message
Click Submit
User is prompted with the message as “Thank you for contacting us! We will get back to you shortly”
Custom Escalation
iAMS comes with an escalation module, which allows the user to escalate anything (an alarm/a condition) up to 5 levels. Users can configure this over SMS OR email OR both.
Users can choose to send the escalations always OR in a specified window of time only. Users can configure the SMS/email to an individual or a group.
Escalation rules are listed in the list below with the following fields – Rule name, Level, Duration, SMS (tick), email(tick)
Users can define the escalation rules (conditions) with the simple UI provided. The rule are nothing but a set of predefined conditions. The conditions work based on Site Open, Site Closed, Asset Open, Asset Closed, Alert with logical operators as Less Than, Equal, Greater Than and Between.
The above UI will help user to define the logical operators to get the value(s). User can select a unit as time interval of minutes, hours, days and count. User can also define a rule within the specified duration using the start time to end time.
Instant Alerts
This module shares the Alerts list based on the condition. On clicking the Alerts icon, the alerts list is displayed. By default, 5 alerts can be viewed and the rest of the alerts The list of alerts will be displayed with Timestamp, Site ID, Alert Type, Alert, Description and Status. Users will have in their preferences whether to have the closed alerts displayed or not and as well the number of days the alerts should be listed.
Users search the alerts OR can filter the alerts between a time frame, with a Site ID, Alert Type, Alert Name.
Live Ticker
There are three types of ticker in IAMS.
- System: Indicates User Keys, Locks, Programmers and SMS Gateway statistics based on inventory and status.
- Alerts: Indicates site status based on maintenance type, severity and assigned vendor/work order.
- Sites: Indicates site statistics based on maintenance type and severity type.
System ticker shows the statistics of the below status of Access Media, Access point, Programmer
Access Media Assigned- Number of Keys Assigned
Access Media Unassigned- Number of Unassigned Keys
Access Media To be updated- Number of Keys to be updated
Access Media Expired- Number of Keys Expired
Access Media Blacklisted – Number of Blacklisted keys
Access Media Unused- Number of Unused Keys
Access Point Assigned – Number of Locks assigned
Access Point To be Deleted – Number of Locks to be deleted
Programmer – Number of Programmers configured
It shows the Statistics count of Site access based on the Open and Close and Maintenance based on the Maintenance Start data and End date
Site Access – Green – Number of Sites accessed and in Closed status
Site Access – Red – Number of Sites accessed and in Open Status
Maintenance – Red - Number of Site’s where the Maintenance Time period exceeds the current date
Maintenance – Orange - Number of Site’s under PPM which needs maintenance before the end date
It shows the Summary of Site access based on the Open and Close and Maintenance based on the Maintenance Start data and End date
Site Access – Red – Site details of the Opened Site are displayed
Maintenance – Red – Site details of the missed Maintenance are displayed
Maintenance – Orange – Site details of whose Maintenance is due
User Clipboard
The Clipboard is a smart feature, allowing users to capture screen shots, save current work/documents for future use. There are three main Clipboard functionalities; save work, take screenshot and save as document.
Save work is used whenever the account user needs to save the current work and continue later.
Take screenshot is used for personal reference or to share with other authorized account users.
Save document is used for personal reference or to share with other authorized account users.
Each account user has their own Clipboard that can have up to 10 Clipboard Items valid to a maximum of 7 days (configurable against account). After 7 days the Clipboard Item is automatically deleted from the list Clipboard.
User can (from the options) renew/delete a clipboard item.
The illustration below defines each element of the Clipboard Item
In App Messaging
It is used to send Messages between Account Users
Build
User can get custom reports generated based on the predefined reports by removing, rearranging, sorting columns and using the additional filters provided against reports.
The filters are:
-Geography (Country, Region, Cluster)
-Duration
-Report Columns
-Columns Value Range (Less than/Greater than/Between/Equal
1.Once a report is generated, users can customize the reports with the report builder tool.
2.This allows the user to reorder, delete columns of the report, sort the columns up to 4 levels (columns), filter the columns by category for up to 4 columns, filter the columns by value up to 4 columns.
3.Filtering on values comes with conditions as Less than, Greater than, Between. User can filter/adjust the duration of the report also with the slider control.
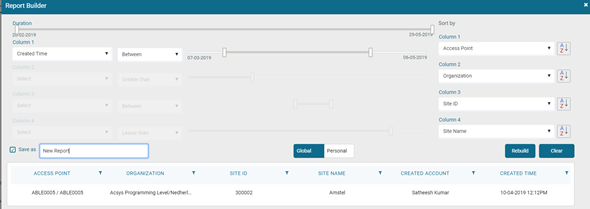
4.Once the report is customized with necessary sort and filters, user can click ‘Rebuild’ to get the changes effected.
Once rebuilt, user can save the template for further use/scheduling. User (with access rights) can either save it as a personal template or a global template.
GIS Tracker
User - UserId,Start Date,End Date and Then press Track User. It displays User activity within selected details
Site - Sites,Radiues,Kilometer. It displays User with the selected details
Work Orders/Tickets
Ticket created in Maintenance can limit the start date and end date and assign to user using the Ticket Type
Delete
One or more tickets can be deleted. If Tickets is assigned to any user then it cannot be deleted.
Maintenance
It is Used to created Different Type of Tickets.Tickets can be created for a specific Assets with a particular Time Period. Within the specified time only User can able to Receive Code
Delete
One or more tickets can be deleted. If Tickets is assigned to any user then it cannot be deleted.
Programmer
This module holds the details of all the Hardware related information used for access control.
In this page, the Programmer details are managed here, and User can view the Programmer Status as Online/Offline.
Click SYSTEM MENU -> INVENTORY -> PROGRAMMER
User has Add, Delete, Export & Clear functionalities
Add Programmer
1.Select the Type of Programmer from the “Programmer Type” dropdown
2.Enter the Programmer Serial Number, Alias Name and Programmer ID and Click Save
Note: The Programmer ID is the ID shown in the Connect as below.
Delete Programmer
Select the desired Programmer from the Grid and Click “Delete”. Programmer deleted successfully.
Export Programmer
Programmer list can be exported in the PDF & Excel format.
Access Policies
Users can set the policy by restricting to selected Asset Points and Assets. Also create Policies against the User or set Global policy and assign to the Key Users
Access Policies
Click ACTION -> ACCESS POLICIES.
Users can Add, Edit, Delete, Export and Clear the Policies details
Add Access Policies
1.Enter Access Policy Name, select Access Media Type
2.Click “Global Policies” (Policy not specific to single User) OR Select Username from the list (Policy set for Specific User)
3.Select Start Date, Start Time, End Date and End Time OR Indefinite
4.Select the option 24/7 or Custom
a.24/7 – Full time access
b.Custom – Based on the Time slots
5.Select Renewable option (Applies to Non CGSPlus and Bluetooth Key)
a.Click Yes and set the Frequency, renewable cycle, day and time
6.Select the Asset Point from the Asset Point selection panel
a.User can select “ALL” or “Selected” Asset point and Assets
7.Click Save and Access Policies saved successfully
Edit Access Policies
Select the desired Access Policy from the grid, modify the changes and Click “Save”. Access Policy updated successfully.
Delete Access Policies
Select the desired Access Policy from the grid and click “Delete”. Access Policy deleted successfully.
NOTE: Access Policies assigned to the Users will not be deleted.
Export Access Policies
Access Policies list can be exported in the PDF & Excel format.
Access on the Go
Admin Users generates Open/Close Code via System when the Field user calls and request Access.
1. Select the User for whom Access is required
2. Select the Asset Point ID and Assets
3. Enter Pin and Reason for request
4. Select the Code type and validity
5. Select Send SMS if user wants the code in SMS
6. Click “Get Code” and Code should be generated successfully as below
MIS
Shows the company’s KPI in form of statistical widgets. Each widget is individually configurable and exportable.
The software comes with the MIS and GIS view showcasing the summary information about sites, site assets, locks and their status. User can get a summarized view of their area of interest and get into further details from here. User can switch between MIS and GIS views with in the dashboard. GIS will show the sites based on the categories of widgets selected for the MIS.
All the widgets are by default display last 24 hours data. The comparison will plot the last 24 hours data against the data for the selected duration in the single widget. Comparison is not available for pie and doughnut widgets
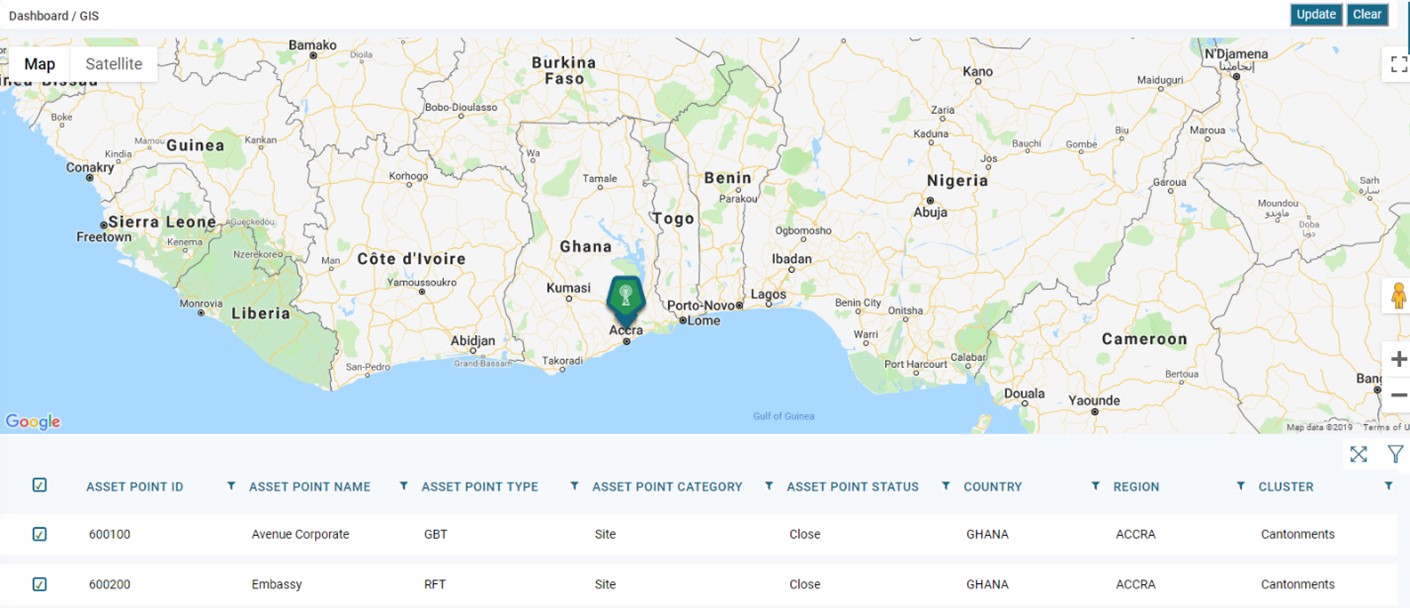
GIS
The operation center can use this view for easy monitoring of their remote assets. They can view the activity happening in the field at distributed sites in remote locations and get the periodic updates populated on screen. This combined with the alerts and statistics helps them to get timely feeds from the field and can monitor/control their operations.
Based on the filters, sites will be displayed on the map with a list of sites at the bottom with the following details – Site ID, Site Alias, Site Type, Site Category, Site Status, Open Locks, Total locks, Country, Region, Cluster. Overlay on Open Locks show the Asset, Lock Alias, Open Time. Site ID links to Site FACT Sheet.
GIS view has filters provided as –
1.Geographical (tree view)
2.Site Status (any lock open/close)
3.Site Type (GBT/RFT)
4.Site Category (VIP/Hub/Site)
5.Tenant (Distinct tenants )
6.Vendor (Distinct vendors)
7.Key User (Distinct key users)
Geographical Information System – shows the Organization’s Asset Point in geographical view with Asset Point Status (Closed & Open)
Users can get this view for easy Monitoring of their Field Assets.
Click DASHBOARD -> GIS
MIS Premier
Displays data in pictorial Representation
It displays following data
1.Overtime
2.Active Users
3.Blocked Users
4.Secured Sites
5.Need Maintenance
6.Access Media
7.Open Sites
8.Access Media Updates
Utilities
iAMS Connect
iAMSConnect is the software which connects the Acsys Software products and the hardware products. User can initialize,
configure and delete the hardware associated with the Acsys software components using this software utility.
Admin users can launch iAMSConnect from the browser itself. The required software component gets installed on to the local computer once user launch it from the browser.
It always check for any new update and install updates before launching the software component. This makes sure the maintenance of this component is managed easy.
Click System --> Utilities --> iAMSConnect
The iAMSConnect launch page will be displayed.
Click on the ‘Launch iAMSConnect’ button to get AcsysXConnect installed and configured on to the required system.
Once iAMSConnect is installed, it will start automatically. User need to login to AcsysXConnect to proceed.
Once logged in, user can connect with the hardware (Access Media/Access Points – using Transfer Keys)
Note: Once the desired operations are performed, user can close AcsysXConnect, however, it will be running in background unless the same application is closed.
Sites
iAMS Telecom is made centric around the most important entity – Site. This host the telecom tower site, the backbone of telecom infra operations.
User can import site list into the software, set/configure its assets, locks etc. Users can access the site information and get the inventory of assets with in the site.
It details the modules Sites, Site Tenants, Site Assets and Site Fact Sheet.
Sites
Click on Site --> Sites to open the sites list page. Sites already added to the system (based on the geographic access level of the logged in user) will be displayed as a list.
The list will have the site details – Site ID, Site Name, Country, Region, Cluster, Tenant Count, Site Assets, AP(s) deployed and site status (Open/Close).
Users can navigate to the Site Tenants page or Site Assets page by clicking the ‘+’ (in case the same is not entered at all).
Clicking on Site Status will list all the Access Points and their status against it.
Legend:
Indicates a closed condition,
indicates an Open condition
Add Site
Users can add new Site by clicking on the down arrow at the top of the Sites listing.
Site details will be displayed at the top of the page by minimizing the list.
Site Alias – A reference name
Site PM – Frequency of Preventive Maintenance at site
Last PM Date – Date of last Preventive Maintenance done at site
Estate Owner - The owner of the Land/Building from whom, the property is leased from.
Key in the required fields and click ‘Save’ from the ‘ToolBox’.
Once details are saved an information window will be displayed. Click ‘OK’ to close the information window.
Note: Click on the Site ID to open the Site Fact Sheet from anywhere in the application.
Edit Site
User can edit a Site by clicking the checkbox against it. The selected site details will be displayed on the site details page.
Modify the required fields and click ‘Save’ from the ‘ToolBox’.
Once details are saved a confirmation window will be displayed. Click ‘OK’ to close the confirmation window
Delete Site
Users can delete a Site by clicking the respective Site name from the list and click ‘Delete’ from the ‘ToolBox’.
A confirmation window will appear confirmation. Click ‘OK’ to delete the respective Site
Note: Click ‘Cancel’ will close the confirmation window.
Once deleted, an information window will be displayed. Click ‘OK’ to close the information window.
Site Tenants
Site Tenants refers to the tenants associated with a site.
iAMS allows users from Vendors and Tenants also access iAMS Telecom Software.
Tenants will get the details of their respective sites and assets by this categorization.
Click from the main menu Site --> Site Tenants to navigate to the Site Tenants page.
Sites Tenants already added to the system (based on the geographic access level of the logged in user) will be displayed as a list.
Add Site Tenants
Users can add new Site Tenants by clicking on the down arrow at the top of the Site Tenants listing.
Site Tenant details will be displayed at the top of the page by minimizing the list.
Key in the required fields and click ‘Save’ from the ‘ToolBox’.
Once details are saved an information window will be displayed. Click ‘OK’ to close the information window.
Edit Site Tenants
User can edit a Site Tenant by clicking the checkbox against it. The selected Site Tenant details will be displayed on the site details page.
Modify the required fields and click ‘Save’ from the ‘ToolBox’.
Once details are saved a confirmation window will be displayed. Click ‘OK’ to close the confirmation window
Delete Site Tenants
Users can delete a Site Tenant by clicking the respective Site name from the list and click ‘Delete’ from the ‘ToolBox’.
A confirmation window will appear confirmation. Click ‘OK’ to delete the respective Vendor.
Note: Click ‘Cancel’ will close the confirmation window.
Once deleted, an information window will be displayed. Click ‘OK’ to close the information window.
Site Assets
Site Assets refers to the Assets associated with a site. Asset can belong to the Infra Company/Tenants
Click from the main menu Site --> Site Assets to navigate to the Site Assets page.
Sites Assets already added to the system (based on the geographic access level of the logged in user) will be displayed as a list.
Add Site Assets
Users can add new Site Assets by clicking on the down arrow at the top of the Site Assets listing.
Site Assets details will be displayed at the top of the page by minimizing the list.
Key in the required fields and click ‘Save’ from the ‘ToolBox’.
Once details are saved an information window will be displayed. Click ‘OK’ to close the information window.
Note: The Defaults Assets Types will be displayed. User can add more Asset Types from the Asset Types
(under Inventory menu) to add more Asset Types as required. Once added, the same will be available against sites.
Edit Site Assets
User can edit a Site Assets by clicking the checkbox against it. The selected Site Asset details will be displayed on the site details page.
Modify the required fields and click ‘Save’ from the ‘ToolBox’.
Once details are saved a confirmation window will be displayed. Click ‘OK’ to close the confirmation window
Delete Site Assets
Users can delete a Site Assets by clicking the respective Site name from the list and click ‘Delete’ from the ‘ToolBox’.
A confirmation window will appear confirmation. Click ‘OK’ to delete the respective Vendor.
Note: Click ‘Cancel’ will close the confirmation window.
Once deleted, an information window will be displayed. Click ‘OK’ to close the information window.
Site Fact Sheet
Site Fact Sheet details and represents the actual tower site electronically. It list all the Tenants, Assets
The site’s status is shown through a small icon on the right hand side of the panel. In the example illustrated here, the site is Open and under maintenance.
User can add the actual site photographs here by clicking on the Site image and browse and select the required image.
Action
Access On the Go
Access Policies
Access Media Issue/Return
Blacklist Access Media
Maintenance
Work Orders/Tickets
Reports
Generate
Users can generate the reports, view the data on the screen, sort/rearrange the columns and export the same. Access log report consist of all the access related information against site per asset/Lock. It consolidates the ticketing information, user information and the key information
Access Media Battery Status
Entry & Exit report
Access Media List
Expired Access Media List
Access Point Access Logs
Programmer (USB/IP/3G) Status
Access Points in Sites
Security guard report
Access Point List
Site Access Statistics
Access user log
Transfer Keys Operation Logs
Accounts Operation Logs
Unauthorized access logs
Blacklisted Access Media List
Unused Access Media List
Deleted Access Media List
User Access Logs
Deleted Access Point List
User Access Rights
Detailed Access Log
User code request log
1.Users can export the reports into PDF/Excel Format OR email it directly from the application.
2.Users can also save the template after reordering the rows/columns and save it as a reporting template. This can be scheduled for manual generation/automatic emailing to specified email IDs
Build
User can get custom reports generated based on the predefined reports by removing, rearranging, sorting columns and using the additional filters provided against reports.
The filters are:
-Geography (Country, Region, Cluster)
-Duration
-Report Columns
-Columns Value Range (Less than/Greater than/Between/Equal
1.Once a report is generated, users can customize the reports with the report builder tool.
2.This allows the user to reorder, delete columns of the report, sort the columns up to 4 levels (columns), filter the columns by category for up to 4 columns, filter the columns by value up to 4 columns.
3.Filtering on values comes with conditions as Less than, Greater than, Between. User can filter/adjust the duration of the report also with the slider control.
4.Once the report is customized with necessary sort and filters, user can click ‘Rebuild’ to get the changes effected.
Once rebuilt, user can save the template for further use/scheduling. User (with access rights) can either save it as a personal template or a global template.
Schedule
Users can schedule the reports once generated or customized using the report builder to send reports on daily, weekly and monthly basis to individuals or groups of users. The report sent automatically by email is only in CSV format which can be easily imported into excel to apply filters and calculations to the reports.
Reports
Reports
Alerts
Tracker
Communication Settings
Email Settings
Control Center
Alerts
Support
Change Password
Help
Settings
Capture
Lock
Live Chat
Ticker
Clipboard
MIS

